
| Web design workflow is an organized process that guides how a website is created. It starts with understanding goals and user needs, then moves through planning, design, and development. After that, the site is tested for performance and usability before being launched. |
Building a website, but no idea what should happen next? Design, content, code, deadlines…everything hits at once. That is exactly where a web design workflow guide saves you.
Your last website project probably started with excitement and slid straight into chaos, endless edits, shifting briefs, and missed deadlines. That usually happens when you jump in without a clear web design workflow. A workflow gives you a simple, structured way to plan, design, test, and launch a site that actually supports your goals. This guide gives you your web design workflow explained from end to end: what it is, the exact steps, tools, best practices, and how an expert runs a full web design workflow from planning to launch.
What Is A Web Design Workflow?
A web design workflow is a structured process that guides every stage of your website design process from first idea to live site. It is the set of repeatable web design workflow steps you follow: discovery, planning, UX, UI, handoff, testing, and launch, plus the tools and checklists that support them.
A typical website design workflow process includes these steps:
- Research and discovery
- Strategy and website workflow design
- Wireframing and UI/UX design workflow
- Visual UI/UX website design
- Handoff to development and the web development workflow process
- Testing, launch, and post‑launch improvements
When you build this out clearly, you stop guessing how web design workflow works and start using it to avoid confusion, cut website cost, and ship better sites faster.
The Web Design Workflow: Step-By-Step Process
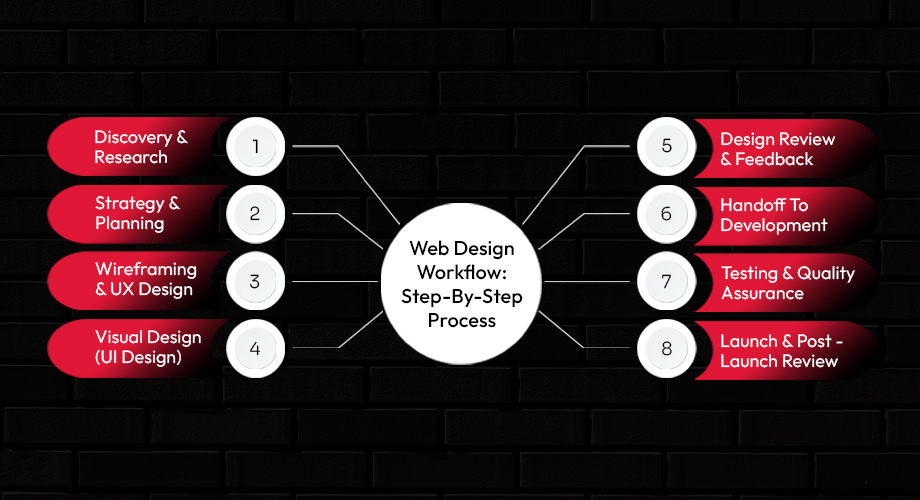
Think of these eight stages as the core stages of web design. You can treat them as a solid web design workflow for beginners, then refine them into a custom Web design workflow template for every future project.
Step 1: Discovery & Research
In discovery, you gather the raw information that shapes every decision that follows.
- Define business and website goals
- Understand your target audience and their pain points
- Review competitor sites and current website design trends
- Decide on success metrics (leads, sales, sign‑ups, engagement)
This early work anchors your entire website design workflow so you design for real people and real outcomes, not just good‑looking pages. This stage uncovers why the site exists and who it serves.
Step 2: Strategy & Planning
Next, you design the backbone of your website workflow design before you touch detailed layouts.
- Build a sitemap that lists and groups all key pages
- Plan content structure and priority for each section
- Map user journeys from entry to action (e.g., buy, book, enquire)
- Consider technology, platform, and integration needs
This is where your website design workflow process defines what will actually be built and how the pieces fit together. When you slow down here, the rest of your website design process runs far more smoothly. This stage defines what will be built.
Step 3: Wireframing & UX Design
Now you turn strategy into simple page layouts and flows.
- Create low‑fidelity wireframes for key pages
- Focus on information hierarchy and scannable sections
- Validate user flows (how someone moves page to page)
- Check that every journey leads to a clear call to action
This is the practical core of your UI/UX design workflow. You are not worried about colours yet; you are shaping a web design workflow example of how users will actually move through your site. This stage defines how users move through the site.
Step 4: Visual Design (UI Design)
With UX in place, you bring your brand and visuals to life.
- Apply brand colours, typography, and imagery
- Create high‑fidelity mockups for key screens
- Ensure accessibility (contrast, font sizes, clarity)
- Keep layouts flexible for a smooth, responsive web design process
This is where your UI/UX website design gets its final look and feel. You can follow website design trends where they make sense, but you always protect clarity and usability first. This stage defines how the website looks.
Step 5: Design Review & Feedback
Here, you make sure everyone agrees on the direction before anything is built.
- Run internal reviews to catch obvious gaps
- Collect structured client or stakeholder feedback
- Group comments and decide what to change, keep, or drop
- Lock designs at clear approval checkpoints
A strong feedback stage prevents the most common web design mistakes: vague comments, endless rework, and late‑stage layout changes during development. This is where you keep your web design vs web development workflow neatly separated. This stage ensures alignment before development.
Step 6: Handoff To Development
Now you bridge your web design workflow and the web development workflow process so code can begin without confusion.
- Share organized design files and version‑locked mockups
- Provide design specs, grids, spacing, and interaction notes
- Export and deliver optimized assets (icons, images, logos)
- Share any design system or Web design workflow template elements that developers must follow
When handoff is clear, your web design workflow vs web development workflow feels like one continuous journey, not two separate worlds. That alignment saves time, reduces bugs, and protects your website costs from surprise overruns. This stage bridges design and development.
Step 7: Testing & Quality Assurance
Testing makes sure your design works in the real world, not just in your design tool.
- Check layouts across devices as part of a thorough responsive web design process
- Test in modern browsers and key operating systems
- Review performance (page speed, image weight, basic SEO)
- Run accessibility and usability checks where possible
Treat this as a non‑negotiable step in your web design workflow from planning to launch. It is far cheaper to catch issues here than fix them after users complain. This stage ensures the design works in real‑world conditions.
Step 8: Launch & Post‑Launch Review
Finally, you move from a polished design to a live product.
- Run final pre‑launch checks using your web design workflow checklist
- Deploy the site to production and confirm everything loads correctly
- Set up analytics, events, and basic dashboards
- Review early performance against the success metrics from discovery
This closing step turns your structured web design workflow explained into measurable results. You also log lessons learned so you can refine your web design workflow steps for the next project. This stage moves the design from draft to live product.
Tools Commonly Used In A Web Design Workflow
You do not need every tool on the market; you just need a focused stack that supports your website design workflow at each stage. Think of tools as helpers, not the main event. Here’s a simplified table:
| Stage | Typical Tools | Why do they help you |
| Research | • Google Trends, AnswerThePublic, SurveyMonkey • Airtable or Notion (research database) | Gather real user insights, organize findings, and keep the data you need for the next step in one place |
| Wireframing | • Figma (free tier) • Balsamiq • Sketch (macOS) | Sketch low‑fidelity layouts fast, test navigation early, and hand off a clear skeleton to the design team |
| Design | • Figma (design system libraries) • Adobe XD • Pen & paper (quick sketch) | Build high‑fidelity mockups, apply brand colours, and create reusable components that speed up later stages |
| Feedback | • InVision or FigJam comment mode • Miro (sticky‑note board) • Slack or Microsoft Teams (quick chat) | Capture stakeholder notes directly on the design, keep conversations organized, and avoid endless email threads |
| Handoff | • Zeplin (specs export) • Figma’s Inspect panel • GitHub or Bitbucket (code repository) | Deliver exact measurements, CSS snippets, and assets so developers can start building |
Choose one tool per stage and stick with it throughout the project. Consistency reduces friction and keeps the web design workflow moving smoothly. Here’s an explained version based on what you need:
Research
Tools here help you replace guesswork with real data.
- Analytics tools - Platforms like Google Analytics show how visitors currently use your site, so your website design workflow process responds to real behaviour.
- User feedback tools - Surveys, chat transcripts, and interviews reveal pain points that guide your website workflow design.
- Planning and notes - Docs, whiteboards, and shared workspaces store research, goals, and early ideas where your whole team can find them.
Wireframing
Wireframing tools let you sketch ideas fast without getting stuck on details.
- Low‑fidelity wireframing apps - Simple tools help you outline structure and flows quickly, which is ideal for a web design workflow for beginners.
- Journey mapping tools - Visual flow tools help you document paths from landing page to conversion, feeding into your UI/UX design workflow.
Design
Design tools turn rough wires into polished UI.
- UI design platforms - These help you create high‑fidelity mockups, components, and design systems for consistent UI/UX website design.
- Asset creation tools - Image editors and vector apps prepare icons, photos, and graphics without slowing your responsive web design process.
Feedback
Feedback tools organize conversations so you avoid scattered comments and misalignment.
- In‑file comments - Commenting inside your design tool keeps feedback tied to exact elements and screens.
- Project boards - Simple boards track decisions, blockers, and approvals across your web design workflow from planning to launch.
Handoff
Handoff tools connect your web design workflow to development smoothly.
- Inspect and spec tools - These share spacing, colours, and CSS snippets so developers build precisely from your designs.
- Documentation hubs - Shared spaces store guides, assets, and your web design workflow checklist so new people can onboard quickly.
Whether you work independently or with a website design agency, a small, well‑chosen toolset is usually enough to keep projects moving steadily.
Common Web Design Workflow Mistakes
Even a good web design workflow template can fall apart if you skip key steps. Here are pitfalls to watch for.
- Skipping research
When you skip discovery and competitor analysis, you design in the dark. That leads to misaligned layouts, weak messaging, and website costs spent fixing avoidable issues later.
- Designing before strategy
Jumping straight into visuals without a sitemap or content plan is one of the biggest common web design mistakes. You end up forcing content into designs instead of designing around your message.
- Poor feedback loops
Unstructured feedback includes late emails, vague comments, and random opinions. It slows your website design workflow and triggers rework. Centralized, clear feedback keeps your web design workflow steps tight and efficient.
- No documentation
If everything lives in people’s heads, you repeat the same problems on every project. Simple docs that explain how the web design workflow works become a playbook you can refine instead of reinventing.
- No real testing
Rushing the launch without proper QA and a responsive web design process leads to broken layouts, slow pages, and accessibility issues. Treat testing as a core part of your stages of web design, not an optional extra.
When you avoid these traps, your website design workflow process becomes a reliable asset that saves time, money, and energy on every build.
Best Practices For An Efficient Web Design Workflow
Too many edits, unclear feedback, shifting timelines? A few simple habits can transform how smoothly your web design workflow runs. Great workflow practices keep everything organized, help teams collaborate smoothly, and get you to a polished site. Here are the best practices that make it happen.
- Clear roles: Assign owners for research, content, design, development, and QA so tasks never float without responsibility.
- Defined milestones: Set obvious checkpoints like “wireframes approved” or “content signed off” to keep your website design workflow predictable.
- Centralized feedback: Keep all comments inside one tool or document so your web design workflow template does not get derailed by stray emails.
- Design systems: Reuse components, colours, and typography to keep UI/UX website design consistent and faster to produce.
- Documentation: Write down your web design workflow, including a simple checklist, and update it after every project.
An efficient web design workflow is about more than speed; it’s about consistency, clarity, and creativity working together. By following these best practices, you can reduce friction, stay aligned with goals, and create exceptionally good websites.
How The Scale Tech Approaches Web Design Workflow
When you work with The Scale Tech, you do not just get screens; you get a clear, structured web design workflow that you can actually follow and trust. The focus stays on UX, collaboration, and performance, so your website design workflow feels controlled instead of chaotic.
The Scale Tech Workflow Explained:
For Crystal Transportation (a transport services brand), The Scale Tech used a simple, repeatable flow you can model:
| Stage | What Happened |
| Discovery & UX Strategy | Goals, key routes/services, and user types were clarified, then mapped into journeys and a UX‑first UI/UX design workflow. |
| Wireframes & Visual Design | Clear booking and enquiry flows were wired first, then turned into a modern, trustworthy interface aligned with Crystal’s brand. |
| Dev Handoff & Build | Design specs, components, and edge cases were documented, making the web design workflow vs web development workflow handoff smooth. |
| Testing & Launch | Responsive, usability, and performance checks were run before launch, then refined using early user behaviour. |
Why This Beats Your Ordinary Experience?
Compared with a generic website design agency, The Scale Tech gives you:
- A visible, step‑by‑step web design agency workflow, not a vague promise and shifting deadlines.
- UX‑first decisions that reduce common web design mistakes and protect your website cost.
- Tight design-dev collaboration, so your website design workflow does not fall apart once development starts.
- You end up with a process you can reuse, not just a one‑off project.
In short, The Scale Tech’s structured, collaborative web design agency workflow turns a chaotic redesign into a predictable, growth‑focused project, just like the Crystal Transportation success story. You can see this approach in action with The Scale Tech.
Are you ready to tighten your process? It’s time to book an expert-guided web design consultation with The Scale Tech team to review your current website workflow design and explore practical improvements.
Web Design Workflow As A Growth Framework
A web design workflow is not bureaucracy; it is your growth framework. When you treat your stages of web design as a clear system review, you get faster builds, fewer surprises, and websites that actually support your strategy.
Instead of starting from scratch each time, you refine your own web design workflow template and repeat it. That is how web design workflow works as a growth engine: every project feeds learning into the next.